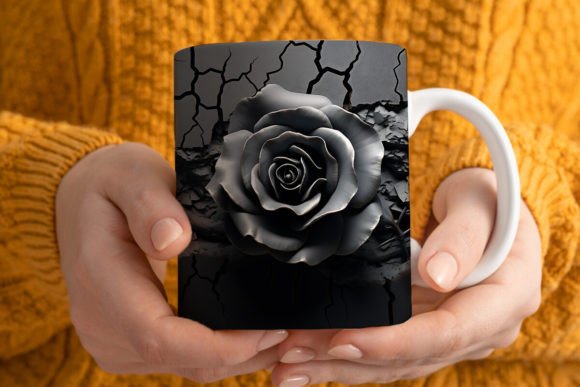
Mastering 3D Black Rose Mug Wrap Sublimation for Professional Results
The allure of a 3D Black Rose Mug Wrap Sublimation design lies in its dramatic aesthetic and the illusion of depth it brings to everyday drinkware. Unlike flat vector art, a true 3D design utilizes shading, highlights, and layering to make the floral elements appear as though they are rising off the ceramic surface. For creators ranging from hobbyists to small business owners, leveraging a high-quality Black Rose watercolor or 3D seamless pattern can instantly elevate a product line. However, the gap between downloading a stunning Instant Digital Download PNG and holding a flawless finished mug is often bridged by technical knowledge that many overlook. Understanding the nuances of file preparation, printer settings, and substrate compatibility is essential to avoid costly errors and ensure customer satisfaction.
Understanding the Difference Between Flat and 3D Designs
One of the most common misunderstandings involves the nature of the artwork itself. When you purchase a 3D Black Rose Mug wrap, you are acquiring a file designed with specific lighting and shadow cues. A beginner might treat this exactly like a standard straight mug wrap PNG, but the application requires more precision. If the design is not aligned perfectly on the mug, the "3D" effect breaks, and the roses may look distorted or floating awkwardly rather than integrated into the curve of the cup.
Furthermore, there is often confusion regarding the Black Rose background. In sublimation, the white of the mug acts as the canvas for light colors, but a design featuring deep blacks and rich reds needs a solid foundation. If your digital file includes a transparent background intended to be placed over a colored mug, the result will be muddy. Always verify if your Black Rose png includes a printed background or if it relies on the white ceramic. For the specific 20 oz Skinny Mug Sublimation Design mentioned in many listings, the curvature is tighter, meaning the distortion at the edges of the wrap is more pronounced than on a standard 15 oz mug.
Critical Mistakes in File Preparation and Sizing
Even with a premium file, such as one sized at 9.75 in x 4.75 in at 300 DPI, errors often occur during the setup phase in your design software. A frequent pitfall is ignoring the bleed area. When wrapping a design around a cylinder, you must account for the seam where the paper overlaps. If your 3D Black Rose seamless pattern does not align perfectly at the join, a visible white line or a cut-off rose petal can ruin the immersion of the 3D effect.
Another significant issue arises when users attempt to stretch a design meant for an 11 Oz Mug Template onto a 20 oz skinny mug. While it might seem convenient to simply elongate the image, this action distorts the aspect ratio of the roses, making them look unnaturally thin and destroying the 3D perspective. It is far better to source a file specifically tagged as a Black Rose skinny Mug wrap or to recreate the composition using the individual elements provided in a bundle, ensuring the proportions remain true to the original artist's intent.
Additionally, many creators forget to mirror their image before printing. Sublimation transfers are reversed; if you print a 3d Mug Wrap exactly as it appears on your screen, the text (if any) and the directional flow of the rose stems will be backward on the final product. This simple oversight renders the entire batch unsellable.
Hardware and Heat Press Variables
The quality of your final product is not solely dependent on the Digital Download; it is equally reliant on your hardware settings. A beautiful Black Rose 3D seamless pattern can look washed out if the heat press temperature is too low or the dwell time is insufficient. Conversely, excessive heat can cause the blacks to turn brownish or the colors to bleed, losing the crisp definition required for a realistic 3D look.
Pressure is another variable that is frequently mismanaged. When applying a mug wrap sublimation design, especially on a curved surface like a skinny mug, uneven pressure can lead to ghosting—faint double images caused by the paper shifting during the press cycle. Using high-quality heat-resistant tape to secure the mug wrap template tightly against the ceramic is non-negotiable. The paper must be drum-tight; any air pockets between the paper and the mug will result in blurry spots where the ink failed to transfer correctly.
It is also vital to remember that these files are for sublimation mugs only, which have a special polymer coating. Attempting to use a 3d mug sublimation design on a standard ceramic mug without this coating will result in the ink wiping right off. Always test your blanks with a quick scratch test or purchase from reputable suppliers who guarantee sublimation readiness.
Maximizing Value and Usability
To get the most out of your purchase, consider how the file format impacts your workflow. The included ZIP file typically contains a high-resolution PNG File. While PNGs are excellent for preserving transparency and quality, they are raster images. If you plan to resize the 3D background significantly beyond its original dimensions, you risk pixelation. Stick to the recommended sizing of approximately 9.75 in x 4.75 in for standard wraps to maintain the 300 DPI clarity.
For those looking to expand their catalog, think about versatility. A Black Rose wrap designed for a straight mug might need adjustment for a conical shape. Instead of buying multiple separate designs, look for bundles that offer scalable elements or seamless patterns that can be tiled. This approach allows you to create custom layouts for various mug sizes, from the classic 15 oz to the trendy 20 oz skinny, without compromising the integrity of the 3D design.
Checklist Before You Press
Before you commit to a full production run, run through this mental checklist to ensure success:
- Verify Dimensions: Confirm the image size matches your specific mug template (e.g., 11 oz vs. 20 oz skinny) to prevent stretching.
- Check Resolution: Ensure the file is 300 DPI at the printed size to avoid blurry edges on the rose petals.
- Mirror the Image: Always flip the design horizontally in your software before sending it to the printer.
- Inspect the Background: Decide if you need a full-wrap background or a transparent overlay based on your mug color.
- Test Print: Run a single test on cheap paper to check color vibrancy and alignment before using premium sublimation paper.
- Secure the Wrap: Use ample heat tape to prevent shifting, paying extra attention to the seam overlap.
By paying attention to these details, you transform a simple Instant Digital Download into a professional-grade product. The 3D Black Rose Mug Wrap Sublimation niche is competitive, but quality stands out. Whether you are creating gifts for friends or inventory for an online store, the difference between a good mug and a great one often comes down to respecting the technical requirements of the medium. Avoid the temptation to rush the setup process; the time invested in proper file handling and press calibration pays off in the form of vibrant, durable, and visually striking mugs that customers love.